Friday, May 6, 2011
Signature Sheet
Tuesday, May 3, 2011


Thursday, April 28, 2011
'Class Of' clipping mask

For this image, I took many pictures of my friends and overlapped them. I then used a clipping mask on them to form the words 'CLASS OF 2013'.
Thursday, March 31, 2011
Clipping Mask

For this image, I took a field of flowers and added the word flowers on top of it. I then used a clipping mask to bring the flowers through the word.
Original Field:

Wednesday, March 30, 2011
Text Carved In Bark

For this image, I took a picture of bark and changed its color. I then added wood grain and set some text to that grain.
 |
| Original Bark |
 |
| Original Wood |
Tuesday, March 29, 2011
Friend Poster
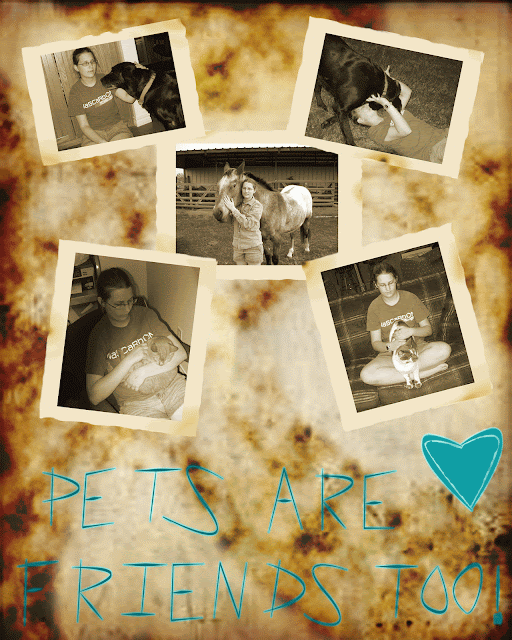
For this poster, I took pictures of me with my pets and put them each onto backgrounds and changed the hue and saturation. I then created a new page(8x10, 300 resolution), and created the poster background using the techniques we used on the retro poster (old paper with color burned clouds). I then placed the pictures on the poster and applied an uneven eraser to the edge and used the burn tool on them. I then created paths in the form of the words 'PETS ARE FRIENDS TOO!" and added a stroke and outer glow. I also created the heart and added and inner and outer glow.
Original Photos


Thursday, March 24, 2011
Design Pattern

For this image, I took a single guitar and duplicated it to make a ring. I then duplicated the ring and re-sized then to create the background. I created a stage, and added my ipod image on the stage. I added hair to the image, so I look like I have hair. Around the guitar in the front, I created two different paths and set the stroke to a brush stroke.
Wednesday, March 9, 2011
Movie Poster

For this movie poster, I created a glowing ball and then added pictures to make it into a movie poster.

I used this meadow as the background for my poster.

I extracted Julie Andrews from this image to use in my poster.

I placed this horse in the background three times. I changed the saturation a little and blurred it to make it fit.

I took the bottom of this movie poster for the bottom of mine. I painted over the creases so that it would blend in.
Monday, March 7, 2011
Vintage Polaroid

Friday, March 4, 2011
Retro Poster

For this poster, I used a photo of me and a photo of my cat to create the cat-lady. I then added a background following the tutorial.
Friday, February 18, 2011
Makeover Me

For this image, I removed a spot on my forehead, whitened my teeth, made my hair pink, put on lip gloss, put on eyeliner, put on eyeshadow, and put on blush.

 |
| Original |
Wednesday, February 16, 2011
Skin Tone

For this image, I filled in the green spots on the face and adjusted the patches' layer mode to color.

Wrinkle Removal

For this image, I used the healing brush tool to remove the wrinkles on this woman's face.

Monday, February 14, 2011


Eye Makeup

For this image, I used different layers with a different mode of each to apply the color. For the upper eyeshadow, I made it look more natural by using a soft eraser around the edges. for the eyeliner, I applied the color and then used an eraser to make it the right size.
 |
| Original |
Friday, February 11, 2011
Change Hair

For this image, I used the quick mask tool to select the hair that I wanted to change. I then changed the hue and lowered the saturation to make it the color that it is now.
 |
| Original |


Thursday, February 10, 2011
Clones

For this image, I used the clone stamp to place the deer in multiple spots in the field. I also used the stamp on the grass around the new deer to make the deer blend in more and seem as though it belongs.

Tuesday, February 8, 2011
Spot Healing

 |
| Original |
Monday, February 7, 2011
Content-Aware Fill

For this image, I used the content-aware fill to remove a post and can from the picture.
 |
| Original |
Color Matching

For this image, I chose two girls with different color shirts. I used the match match color tool in photoshop to change the first girl's shirt from pink to blue.


Thursday, February 3, 2011
Basic Mask

 |
| Original Background |
 |
| Original Person |
Subscribe to:
Comments (Atom)